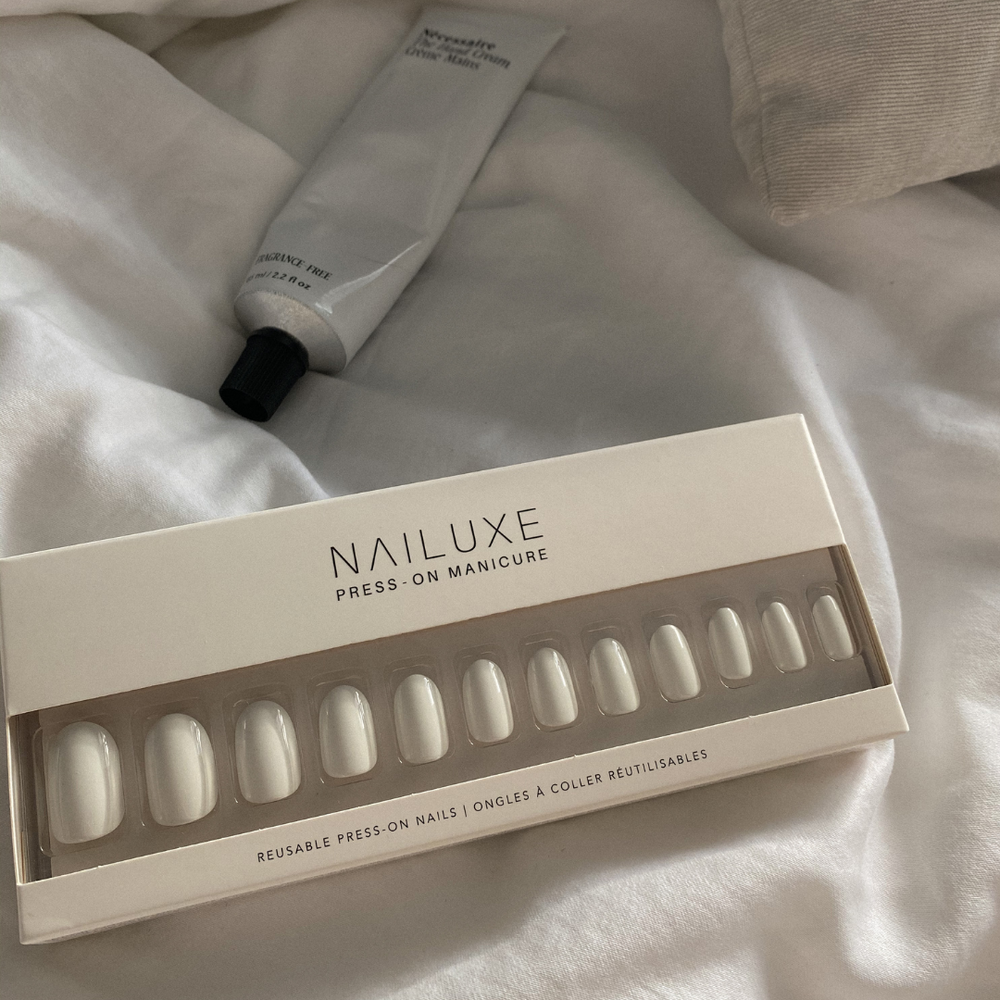

There are endless reasons why we love our tried-and-tested press on nail manicures. Beyond bringing the nail salon straight to you, press-ons allow you to always have perfect nails without having to sacrifice your time, wallet, or natural nail health. Lasting up to two weeks and completely reusable (check out how here), Nailuxe Reusable Press-On Nails are here to revamp and upgrade your beauty routine.

Not only can press-on nails give you endless styles you can re use - from the classic manicure to trendy designs - it can also save you time and effort, fitting perfectly into your busy routine.
Press-on nails stand as a strong contender against other types of manicures, such as gel nails and acrylics, promising incredible results without any of the harsh chemicals and UV light exposure that are part of these other popular methods.
Ranging in nail size, nail shape, and nail art, you'll find a wide variety of options that will have you prepared for any occasion that can pop up on your calendar.

Before diving head-first into your Nailuxe kit, you might find yourself tirelessly googling “how to apply press on nails,” searching for the perfect, all-inclusive guide to get your through the process. Look no further! We made you a 5-step guide blog post to applying your press on nails, stress-free and flawlessly - just like you deserve.
Applying press on nails is simple and to the point - after all, staying on top of your nail game does not mean having to compromise on time.
Ready? Let’s get started.
Pick your style
First things first...
Browse our site for the perfect press on nails for you, from classic to bold and fun, you'll find just what you're looking for.
Browse by nail shapes, bestsellers, and bundles to find the your perfect nail set match!
Clean & Prep
Once you have your press ons picked out and ready to go, all there's left to do is... take care of your own nails. It all starts with a well-prepped foundation. There is no use acing all of the other steps if you start off with badly maintained nail beds.
Cuticles
Dry cuticles might not look entirely threatening to the process, but they definitely impact how well your press-on nails with attach to your natural nail bed.
Use a cuticle remover, nippers, or a nail brush to gently exfoliate and remove any build-up dead skin. While you can definitely take care of this in one go, we recommend you focus on the regular maintenance of your cuticles for the best result. In each Nailuxe press on nail kit, we include a cuticle stick that is gentle enough to push back your cuticles without creating any damage to your nail bed.

Clip
While we recommend you to file your nails regularly to avoid clipping, we can’t always refrain from having to cut down on a lot of length when applying certain shapes or lengths of press on nails. The main purpose of filing and or cutting down your natural nails is so that your nails don't show out from underneath the press on, which helps the press ons look as natural as possible.
Carefully clip your nails to the appropriate length (based on personal preference and your chosen press on nails). Make sure not to go too short, as this can be painful and hurt your skin.
File and Buff
Whether or not you clip your nails first, filing your nails is an absolutely essential step - both for general natural nail health and to successfully apply your press ons. We don't want any snagging!
Take your nail file that comes in your kit (using the blue side) to simply file your nails in one single direction. This way, you will avoid snaggy nails and decrease the possibility of your nails breaking and cracking.

Next, gently buff up the surface of your natural nail with the pink side of the nail file included in your kit. Buffing your nails provides more grip for the glue to adhere, which gives you longer lasting results and wear time. But, if you only plan on wearing your press ons for 3-5 days, we recommend you skip this step.

Use an alcohol prep pad
When it comes to maintaining healthy natural nails, we know acetone and alcohol-based products can get a bad rap - and with good reason. Just like our skin, our nails need to be properly hydrated regularly in order to thrive. This means both cuticle oil and nail oils should be a part of your nail health routine, whereas drying astringents like alcohol should not... but there are exceptions.
Use a cotton pad to rub a small amount of alcohol on the surface of your whole nail, ensuring the removal of any oils or dirt that can stand in the way of the nail glue. We recommend stocking up on some alcohol prep pads to add to your at-home nail care essentials kit. This step is crucial and cannot be skipped when applying press-ons. We always need to ensure the cleanest possible surface, which leads to the most firm application of our nails.
In other words, we are all about natural nail health, meaning we will always tell you to properly hydrate and protect your nails! When applying press on nails, however, a little bit of alcohol or a drying agent such as acetone can go a long way when utilized properly. Of course, don’t forget to always rehydrate your nails in between applications! Keeping a healthy balance is the answer.
Prep can seem tedious, which is why we recommend the regular maintenance of your natural nails. This way, the application process can be cut down significantly when you're in a rush. Try not to go through long periods of time without looking after your cuticles or filing your nails, as this can contribute to more brittle and fragile nails.
Apply the glue
Just like you would a top coat or any nail polish, apply an even layer of glue to your nail bed. Make sure to get all of the corners, too! You don’t want to have your nail glued on crooked and compromise your manicure.

As an alternative, feel free to place the glue directly on the back of the Nailuxe nail, focusing more glue towards the base. You may find that you have more control, facilitating a more even application.
Remember, a single, even layer is all you need! If you do end up over-gluing, immediately wipe any excess glue you see. The glue dries very quickly so you have to do this as soon as any glue starts to spill out. If you follow all of the previous steps correctly, there’s no going wrong! Try out both ways of applying the glue and see what works best for you.
PRO TIP: Applied too much glue and need a quick clean up? Wrap a small square of paper towel around one end of the cuticle stick that comes in your kit. Then, carefully wipe away any excess glue, especially from underneath your nail and around the cuticle where spilling often occurs.
Shop our Brush On Nail Glue for an even easier and seamless glue application.

Align your press-on nails with your natural nails
It’s finally time to apply! Be quick with this process - you don’t want your nail glue to dry out before you get a chance to place your press-on.
When applying, make sure to properly align your press on nails with the bottom and sides of your own nails. Take your time before applying the glue to practice doing this efficiently! We don't want the glue to dry out, and we definitely don't want to have to remove our press on nail once it's attached.
PRO TIP: When gluing, align the press on as close to the cuticle line as possible. Then, apply at a 45-degree angle in a slow controlled motion with even pressure. This will help ensure that there are no air pockets or bubbles trapped underneath the nail!
That being said, practice makes perfect. If you do make a mistake, all you have to do is remove the nails properly (without forcing or pulling) and try again. Practice makes perfect, but we're sure you'll apply press on nails like a pro in no time!
Hold
Once it's on there, apply even pressure to the entire nail in order to properly bond your press-on nails. Press down on your nails for about 15-20 or more seconds to ensure that they are glued properly. This simple step will make sure you press on nails last for longer and are more comfortable on your finger. You don't want your press on nails to pop off because of a silly mistake!
PRO TIP: To ensure your nails last as long as possible, stay away from water for at least the first 2 hours after application. We suggest the best time to apply press ons is in the evening after your bath or shower (your cuticles will be softer and easier to push back too)!
A Quick At-Home Nail Hack...
Prepare your own nail kit
We designed our kits to include all the essentials you need in order to achieve a flawless mani. But, you may find you need a few more items to become a press on pro. Having your own complete at-home nail setup can upgrade your experience, making this already-easy application even more seamless for your beauty routine. After all, we're all about optimizing the process and making it as effortless as possible.
There are plenty of readily available to-go nail kits out there, but nobody knows what you like better than you! By repeating this process, you'll figure out exactly what accessories work the best for you, allowing you to compile the most ideal kit out there.
Some tools you may want to consider including in your kit are a cuticle pusher, a cuticle nipper, a nail brush, a glass nail file, a nail clipper, cotton pads, nail polish remover, and rubbing alcohol.

Flawless nails... every time
There you have it - the best way to apply press on nails, every bit as easy as it should be. We hope you found this guide helpful when applying your press ons. Don't forget to tag us in your photo with your fresh mani at @nailuxeofficial on Instagram.